
Homemade Cheez-Its (Just 5 Real Ingredients)
- 4 days ago
- 5 min read
Updated: 7 hours ago

Crispy, cheesy, and made with ingredients you can actually pronounce. These homemade Cheez-Its are everything you loved about the childhood classic without the bioengineered ingredients hiding in the fine print.
PREP TIME 10min | BAKE TIME 14-16 min | TOTAL TIME 40 min |
QUICK SUMMARY
What it is: A from-scratch version of the classic cheese cracker, made with just five real ingredients and no mystery additives.
Why you'll love it: All the crunch and cheesy flavor you grew up on, made in your own kitchen with ingredients you actually recognize. Plus you control the cheese and more is always better.
How to make it: Shred your cheese, pulse everything together in a food processor, roll the dough thin, cut into squares, chill once on the pan, and bake until golden. That's it.
WHY I LOVE THIS RECIPE
Cheez-Its were my childhood favorite snack. I could genuinely replace a meal just downing a box of them (no shame). So when I became ingredient label aware and started reading what was actually in the foods I grew up loving, Cheez-Its were one of the first things to go. And I missed them. A lot.
Then one day it hit me...I'm an adult. I don't need permission to make them at home.
When you flip that familiar orange box over and actually read the label, it's a lot. Natural flavors, seed oils...none of that needs to be in a cracker. And what really gets me? In the tiniest, most easy to miss fine print, it quietly mentions that the product is made with bioengineered ingredients. Subtly tucked away like they're hoping you won't notice.
Here's the thing: a truly great cheese cracker only needs five ingredients. Flour, cheese, butter, salt, and a little cold water. That's it.
I'm also a huge cheese lover, so you'll notice my recipe calls for 10 oz of cheese instead of the standard 8 oz because in my world, you can never have too much cheese. 😁
And you know who ended up loving these even more than the kids? My husband. I make them in bulk and still can't keep them stocked. Consider yourself warned.

INGREDIENTS
1 cup all-purpose flour — I use Costco's organic AP flour. Good quality, great price, and I always have it on hand.
10 oz hard cheese — This is where the magic happens. My two favorite combos are white cheddar with Jarlsberg and parmesan, or classic sharp cheddar with parmesan. The sharper the cheese, the bolder the flavor in your cracker. Don't be afraid to reach for the extra sharp cheddar — you will not regret it.
¼ cup cold butter — I prefer grass-fed butter for the richer flavor and quality. That said, whatever butter you have on hand works just fine.
½ tsp salt — Plus a little coarse sea salt for the tops. Don't skip that part.
3–5 tbsp cold milk or cold water — I've made this with both and it turns out great either way. Use whatever you have.
VARIATIONS AND SUBSTITUTIONS
Cheese options: Any hard cheese works here. Gruyère, gouda, or pepper jack are all fun variations once you've mastered the classic.
Add seasoning: Garlic powder, onion powder, smoked paprika, or cayenne are great additions to the dough. Start with ¼ tsp and adjust to taste.
Gluten free: A 1:1 gluten free flour substitute works well. The texture may be slightly more delicate but the flavor is just as good.
No food processor: A box grater works great for the cheese and you can use a pastry cutter or your hands to work the butter into the flour. More elbow grease, same result.
INSTRUCTIONS
Shred the cheese. Using a food processor or hand grater, shred the cheese. Remove and set aside.

Make the dough. Place the flour and salt, shredded cheese and butter in the food processor and pulse until mixed and the mixture resembles coarse crumbs.

Add liquid. With the food processor running, add the cold milk or water one tablespoon at a time until the dough just begins to come together. You may not need all of it. I only used 2 Tablespoons.

Form a disk. Turn the dough out onto a silicone mat or parchment paper and press together with your hands into a flat disk.

Roll out. Split the dough in half. Roll the first half into a thin rectangle on parchment paper the thinner the better for a crispy cracker.

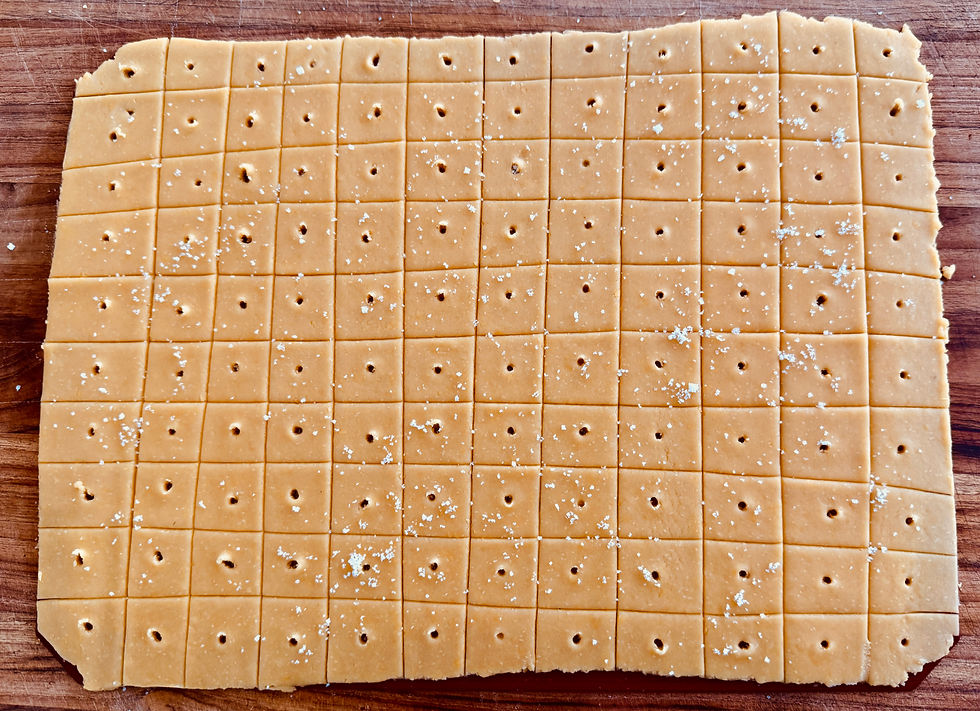
Salt the top. Sprinkle with coarse sea salt and gently press it into the dough with your hand.
Cut into squares. Using a pizza cutter, slice into strips, then cut into small squares. Use a skewer or toothpick to poke a hole in the center of each one.
Chill. Place the baking tray in the refrigerator for 10 minutes. Meanwhile, preheat your oven to 350°F.
Bake. Bake for 14–16 minutes until golden and set.
Cool and store. Let cool for 10 minutes. Don't skip this step, they'll crisp up beautifully as they sit. Break apart any that are stuck together and transfer to a mason jar.
TIPS AND TRICKS
Roll the dough thin but even. I like to put 2 skewers on either side of the dough to get it even. Thick dough means soft crackers.
Make sure your butter and liquid are cold. Warm butter will make the dough greasy and harder to work with.
Don't skip the coarse sea salt on top. It takes these from good to great.
The crackers will not look fully crispy when they come out of the oven. Give them the full 10 minutes to cool. They firm up significantly as they sit.
Make a double batch. You'll wish you did.
STORAGE AND REHEATING
These keep at room temperature in an airtight container or mason jar for a day or two. For longer storage, keep them in the refrigerator where they'll stay crispy and fresh for up to a week. To re-crisp leftovers, spread them on a baking sheet and pop them in a 300°F oven for 3–5 minutes.
FAQs
Can I make these without a food processor?
Yes! A box grater works great for the cheese and you can use a pastry cutter or your hands to work the butter into the flour. It takes a little more elbow grease but the result is the same.
How long do homemade Cheez-Its last?
They'll keep at room temperature for a day or two, but storing them in an airtight container in the refrigerator keeps them crispy and fresh for up to a week, if they last that long!
Can I make these gluten free?
Yes, a 1:1 gluten free flour substitute works well here. The texture may be slightly more delicate but the flavor is just as good.
Why do I need to chill the dough before baking?
Chilling the cut crackers on the pan before they go into the oven helps them hold their shape and bake up flat and crispy instead of puffing up. Don't skip this step, it makes a real difference!
Can I freeze them?
Yes! You can freeze the unbaked dough wrapped in parchment for up to a month. When you're ready, let it thaw in the fridge, roll out, cut, and bake as normal.
My crackers came out soft, not crispy, what happened?
A few things could cause this. The dough may have been rolled too thick, they may have needed a minute or two more in the oven, or they may not have cooled long enough. Give them the full 10 minutes to cool on the pan they crisp up significantly as they sit.
Can I add seasoning to change the flavor?
Absolutely! Garlic powder, onion powder, smoked paprika, or cayenne are all great additions. Start with ¼ tsp and adjust to taste.
What's the best cheese to use?
Any hard cheese works, but sharp or extra sharp cheddar gives you the boldest flavor. The sharper the cheese, the more punch your cracker has. See my ingredient notes above for my favorite combos.
Simple ingredients. Real food. Kid approved and husband obsessed.


Comments